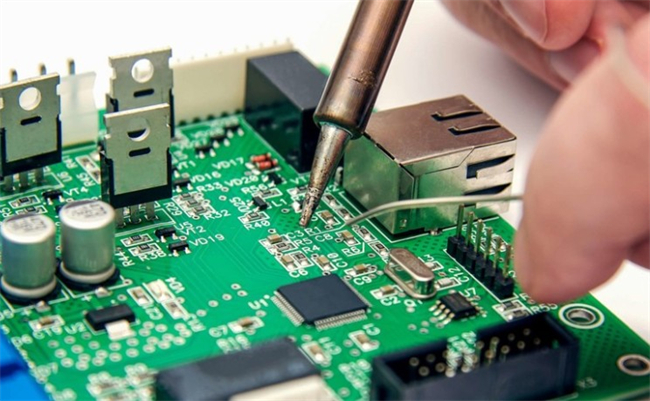
Electronic Soldering Basics and Techniques

About us
ALLELCO LIMITED
Read more
Quick inquiry
Please send an inquiry, we will respond immediately.

Operational Amplifiers: Inverting Vs Non-Inverting Topologies
on January 4th
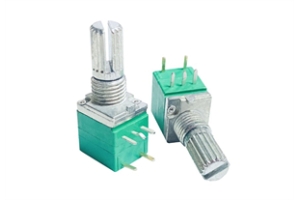
What Is A Potentiometer
on January 3th
Popular Posts
-

What is GND in the circuit?
on January 1th 3272
-

RJ-45 Connector Guide: RJ-45 Connector Color Codes, Wiring Schemes, R-J45 Applications, RJ-45 Datasheets
on January 1th 2815
-
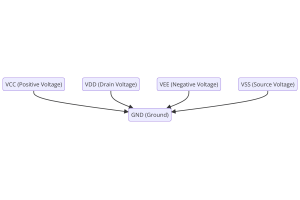
Understanding Power Supply Voltages in Electronics VCC, VDD, VEE, VSS, and GND
on November 20th 2640
-

Fiber Connector Types: SC Vs LC And LC Vs MTP
on January 1th 2265
-

Comparison Between DB9 and RS232
on January 1th 1882
-

What Is An LR44 Battery?
Electricity, that ubiquitous force, quietly permeates every aspect of our daily lives, from trivial gadgets to life-threatening medical equipment, it plays a silent role. However, truly grasping this energy, especially how to store and efficiently output it, is no easy task. It is against this background that this article will focus on a type of coin cell battery that may seem insignificant on the...on January 1th 1846
-
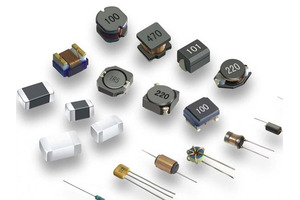
Understanding the Fundamentals:Inductance Resistance, andCapacitance
In the intricate dance of electrical engineering, a trio of fundamental elements takes center stage: inductance, resistance, and capacitance. Each bears unique traits that dictate the dynamic rhythms of electronic circuits. Here, we embark on a journey to decipher the complexities of these components, to uncover their distinct roles and practical uses within the vast electrical orchestra. Inductan...on January 1th 1807
-
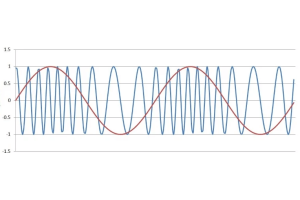
What Is RF and Why Do We Use It?
Radio Frequency (RF) technology is a key part of modern wireless communication, enabling data transmission over long distances without physical connections. This article delves into the basics of RF, explaining how electromagnetic radiation (EMR) makes RF communication possible. We will explore the principles of EMR, the creation and control of RF signals, and their wide-ranging uses. The article ...on January 1th 1801
-

CR2430 Battery Comprehensive Guide: Specifications, Applications and Comparison to CR2032 Batteries
What is CR2430 battery ?Benefits of CR2430 BatteriesNormCR2430 Battery ApplicationsCR2430 EquivalentCR2430 VS CR2032Battery CR2430 SizeWhat to look for when buying the CR2430 and equivalentsData Sheet PDFFrequently Asked Questions Batteries are the heart of small electronic devices. Among the many types available, coin cells play a crucial role, commonly found in calculators, remote controls, and ...on January 1th 1799
-
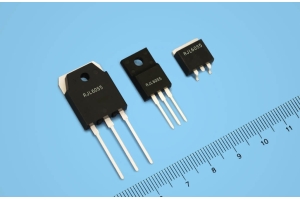
Comprehensive guide to hFE in transistors
Transistors are crucial components in modern electronic devices, enabling signal amplification and control. This article delves into the knowledge surrounding hFE, including how to select a transistor's hFE value, how to find hFE, and the gain of different types of transistors. Through our exploration of hFE, we gain a deeper understanding of how transistors work and their role in electronic circu...on November 20th 1782
HOT Part Number
-

UMK107CH181JZ-T
Taiyo Yuden
CAP CER 180PF 50V C0H 0603
RT0402BRD072KL
Yageo
RES SMD 2K OHM 0.1% 1/16W 0402
95758-022
Amphenol ICC (FCI)
CONN RCPT 20POS VERT GOLD
V48B5H200BN2
Vicor Corporation
DC DC CONVERTER 5V 200W
MAX204CPE
Analog Devices Inc./Maxim Integrated
IC DRIVER 4/0 16DIP
DS1232S+
Analog Devices Inc./Maxim Integrated
IC SUPERVISOR 1 CHANNEL 16SOIC
TPS54355PWPR
Texas Instruments
IC REG BUCK 2.5V 3A 16HTSSOP
BR93G66FJ-3GTE2
Rohm Semiconductor
IC EEPROM 4KBIT SPI 3MHZ 8SOPJ
TPS2066CDGNR-2
Texas Instruments
IC PWR SWITCH N-CHAN 1:2 8MSOP
CDNBS08-SRDA3.3-6
Bourns Inc.
TVS DIODE 3.3VWM 10.9VC 8-SOIC
C0603X6S1C223K030BC
TDK Corporation
CAP CER 0.022UF 16V X6S 0201
EPM7192EQC160-12
Intel
IC CPLD 192MC 12NS 160QFP
MAX1821EUB
Analog Devices Inc./Maxim Integrated
IC REG LINEAR WCDMA 600MA BUCK
0429.250WRM
Littelfuse Inc.
FUSE BOARD MNT 250MA 125VAC/VDC
TC622COA
Microchip Technology
THERMOSTAT PROG ACT HIGH 8SOIC
25TZV330M8X10.5
Rubycon
CAP ALUM 330UF 20% 25V SMD
R3112N151A-TR-FE
Nisshinbo Micro Devices Inc.
IC SUPERVISOR 1 CHANNEL SOT23-5
MX25U3235FZNI-10G
Macronix
IC FLASH 32MBIT SPI/QUAD 8WSON -
AD8617WARZ-R7
Analog Devices Inc.
IC CMOS 2 CIRCUIT 8SOIC
RT8237FZQW
Richtek USA Inc.
IC REG CTRLR BUCK PWM WDFN-10
742861160
Würth Elektronik
FERRITE BEAD 600 OHM 0603 1LN
EPM570T144A5N
Intel
IC CPLD 440MC 5.4NS 144TQFP
V-15-3A5
Omron Electronics Inc-EMC Div
SWITCH SNAP ACT SPST-NO 15A 250V
SDP1800Q38CB
Littelfuse Inc.
TVS DEVICE MIXED 170V 8QFN
MAX8863TEUK+T
Analog Devices Inc./Maxim Integrated
IC REG LIN POS ADJ 120MA SOT23-5
M37046G-12
MACOM Technology Solutions
CDR,LIMITING AMPLIFIER
HIP6018BCBZ
Intersil
SWITCHING CONTROLLER
GRM31CC70J226KE15L
Murata Electronics
CAP CER 22UF 6.3V X7S 1206
12065C184KAJ2A
KYOCERA AVX
CAP CER 0.18UF 50V X7R 1206
1N4054
Solid State Inc.
DIODE GEN PURP 800V 275A DO9
NANO102LC2AN
Nuvoton Technology Corporation
IC MCU 32BIT 32KB FLASH 48LQFP
CRCW12061M10FKEA
Vishay Dale
RES SMD 1.1M OHM 1% 1/4W 1206
HDSP-2532
Broadcom Limited
LED DISPLAY 5X7 8CHAR 5MM HE RED
FSA1259AK8X
onsemi
IC SWITCH SPST-NOX2 850MOHM US8
LTC3831IGN#TRPBF
Analog Devices Inc.
IC REG CTRLR DDR 1OUT 16SSOP
PH9185.034NLT
Pulse Electronics
TRANSFORMER 750UH 3:4 SMD -

70UR120D
Vishay General Semiconductor - Diodes Division
DIODE GP 1.2KV 250A DO205AB
08052A0R5BAT2A
KYOCERA AVX
CAP CER 0.5PF 200V NP0 0805
P6SMB480CA
Bourns Inc.
TVS DIODE 408VWM 658VC DO214AA
TS3A5017DBQR
Texas Instruments
IC SWITCH SP4T X 2 12OHM 16SSOP
SRR4018-100Y
Bourns Inc.
FIXED IND 10UH 1.3A 150 MOHM SMD
AM4378BZDN80
Texas Instruments
MOD ARM CORTEX-A9 491NFBGA
NCS2001SN2T1G
onsemi
IC OPAMP GP 1 CIRCUIT 5TSOP
NVATS5A114PLZT4G
onsemi
MOSFET P-CHANNEL 60V 60A ATPAK
HIN202ECP
Intersil
IC TRANSCEIVER FULL 2/2 16DIP
SSM3K7002BS,LF
Toshiba Semiconductor and Storage
MOSFET N-CH 60V 200MA S-MINI
ISO7763FQDWRQ1
Texas Instruments
DGTL ISO 5000VRMS 6CH 16SOIC
MC33663ALEF
NXP USA Inc.
IC TRANSCEIVER 2/2 14SOIC
HM2P70PDE121N9
Amphenol ICC (FCI)
CONN HEADER 154POS 2MM PRESS-FIT
GRM1555C1H7R3CA01D
Murata Electronics
CAP CER 7.3PF 50V C0G/NP0 0402
CC0402JRX7R9BB562
YAGEO
CAP CER 5600PF 50V X7R 0402
SMF6.5CA
Littelfuse Inc.
TVS DIODE 6.5VWM 11.2VC SOD123FL
MSP430FG4616IPZ
Texas Instruments
IC MCU 16BIT 92KB FLASH 100LQFP
1N2980RB
Microchip Technology
DIODE ZENER 16V 10W DO213AA