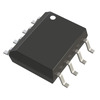
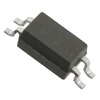
TP4056: Key Parameters, Functions, and Applications in Portable Devices
The TP4056 is a complete single-cell Li-ion battery charger using constant current or constant voltage linear charging modes. Its bottom-mounted heat sink SOP8 or ESOP8 package and low external component count make the TP4056 ideal for portable applications. This article will introduce the parameters, pins, working principle and application of TP4056 in detail to help you better understand and apply this chip.Catalog
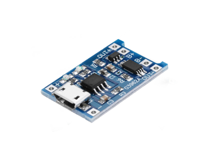
What Is TP4056?
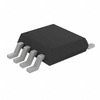
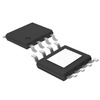
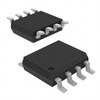
TP4056 is a single-cell lithium-ion battery constant current or constant voltage linear charger with excellent performance. It is packaged in ESOP8. It is suitable for portable products and is also suitable for powering USB power supplies and adapter power supplies. Its input voltage range is between 4.5V and 5.5V, and its charging current range is typically 0.1A to 1.2A, which can be set by an external current limiting resistor. In addition, the TP4056 usually has built-in temperature protection to prevent overheating. Due to these excellent characteristics, TP4056 is widely used in various small portable electronic devices, such as mobile phones, tablet computers, handheld game consoles, etc.
Alternatives and Equivalents
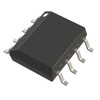
• MP5032GJ-P
Block Diagram of TP4056
Main Parameters of TP4056
Charging Efficiency: About 85 Percent
This refers to the charging efficiency of the TP4056 chip, which is the ratio between the input voltage and the actual charging current of the battery. The higher the charging efficiency, the less heat the chip generates and the faster the charging speed.
Overcharge Protection Voltage: 4.2V
This refers to the overcharge protection voltage value provided by TP4056. When the voltage of the lithium battery exceeds this value, the chip will automatically stop charging to prevent safety issues caused by overcharging of the battery.
Undervoltage Lockout Voltage: 2.4V
This refers to the undervoltage protection voltage value provided by TP4056. When the lithium battery voltage falls below this value, the chip stops output, thereby protecting the battery from over-discharge.
Input Voltage Range: 4.5V to 5.5V
This refers to the minimum and maximum input voltage range that the TP4056 can operate. During the working process, the input voltage needs to remain stable, otherwise it will affect the charging efficiency and stability.
Maximum Charging Current: 1000mA
This refers to the maximum charging current that TP4056 can withstand, that is, the maximum value that the current is allowed to reach in charging mode. If the charging current exceeds this value, it may cause the chip to overheat or be damaged. Therefore, in practical applications, we need to appropriately adjust the charging current according to the battery specifications and specific conditions.
Working Temperature Range: -20°C to 85°C
This refers to the normal operating temperature range of TP4056. Exceeding this range may have an impact on its performance and life. Therefore, in actual application, we need to reasonably select the working current and external components of the chip based on the ambient temperature and heat dissipation conditions to ensure its stable operation.
Pins and Functions of TP4056
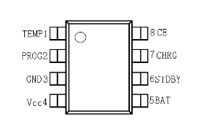
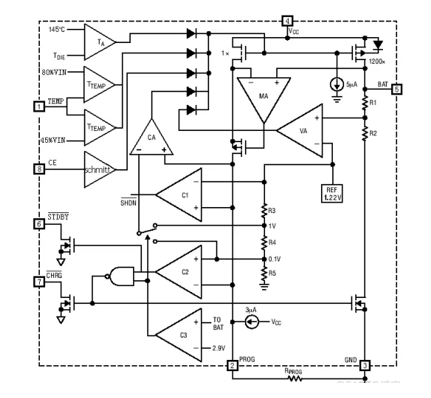
• Pin 1 (TEMP): This is the battery temperature detection input. We need to connect the TEMP pin to the output of the NTC sensor to detect the battery temperature. If the voltage received by the TEMP pin is less than 45 percent of the input voltage, or greater than 80 percent of the input voltage, it means that the battery temperature is too low or too high, and charging will be suspended at this time. If the TEMP pin is directly connected to ground (GND), the battery temperature detection function will be cancelled, while other charging functions will remain normal.
• Pin 2 (PROG): This is the constant current charging current setting and charging current monitoring terminal. We can program the charging current by connecting an external resistor from PROG pin to ground. During the precharge phase, the voltage of this pin will be modulated to 0.1V; during the constant current charging phase, the voltage of this pin will be fixed at 1V. In all modes of charging state, we can estimate the charging current by measuring the voltage of this pin and according to the following formula:

• Pin 3 (GND): This is the power ground.
• Pin 4 (VCC): This is the positive input voltage. The voltage of this pin is the working power supply of the internal circuit. When the voltage difference between Vcc and BAT pin is less than 30mV, TP4056 will enter the low-power shutdown mode. At this time, the current of BAT pin is less than 2uA.
• Pin 5 (BAT): This is the battery connection. We need to connect the positive terminal of the battery to this pin. When the chip is in disabled state or sleep mode, the leakage current of the BAT pin will be less than 2μA. The BAT pin is responsible for providing charging current and a limited voltage of 4.2V to the battery.
• Pin 6 (STDBY): This is the battery charging completion indication terminal. When charging is completed, the STDBY pin will be pulled low by the internal switch, indicating that charging has ended. Otherwise, the STDBY pin will be in a high impedance state.
• Pin 7 (GHRG): This is the charge status indication end of the open-drain output. When the charger charges the battery, the CHRG pin is pulled to low level by the internal switch, indicating that charging is in progress; otherwise, the CHRG pin is in a high impedance state.
• Pin 8 (CE): This is the chip's enable input. A high input level will put the TP4056 in a normal operating state, while a low input level will put the TP4056 into a state where charging is prohibited. The CE pin can be driven by TTL levels or CMOS levels.
TP4056 Charging Circuit Diagram Explanation
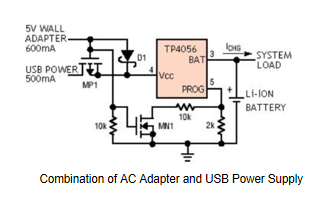
The TP4056 supports charging via the AC adapter or USB port. The following shows an example of how to combine the AC adapter and USB power input. In this case, a P-channel MOSFET (MP1) is used to prevent the signal from traveling backwards into the USB port when the AC adapter is plugged in. Meanwhile, a Schottky diode (D1) is used to avoid USB power loss when passing through a 1K pull-down resistor. Typically, the AC adapter can supply much more current than a USB port with a current limit of 500mA. Therefore, when the AC adapter is plugged in, we can use an N-channel MOSFET (MN1) and an additional 10K set resistor to increase the charging current to 600mA.
Battery Charging Process of TP4056
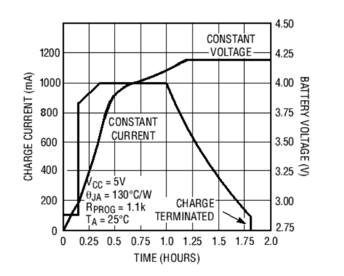
The management chip first performs constant current charging on the battery, and then switches to constant voltage charging. The following is the 1000mA charging current and voltage curve:
The specific process is:
When the battery voltage is lower than 3V, the management chip uses a small current to precharge the battery.
When the battery voltage exceeds 3V, the charger will use constant current mode to charge the battery. At this time, the size of the charging current will be determined by the PROG resistor. For example, to achieve a charging current of 1000mA, a 1.2K resistor should be used.
When the battery voltage is close to 4.2V, the charging current gradually decreases and TP4056 enters constant voltage charging mode.
When the charging current decreases to the charging end threshold, the charging cycle will end. At this time, the CHRG terminal will output a high-impedance state (the red LED is off), and the STDBY terminal will output a low level (the green LED is on).
When the battery voltage drops to 4.05V (this voltage level corresponds to approximately 80 percent to 90 percent of the battery power), the management chip will restart the charging cycle.
Application of TP4056
TP4056 is widely used in various electronic products due to its high precision, overheating protection and other features. The following are some typical application scenarios of TP4056:
LED Lighting
By working together with LED drivers, TP4056 can realize precise control of LED current to ensure that LED beads work in the best condition. This not only improves the lighting quality and makes the LED light more even and softer, but also reduces the risk of LED damage caused by unstable current.
Cell Phones and Tablet PCs
In cell phones and tablet PCs, TP4056 is equipped with multiple protection functions, such as over-current protection, over-temperature protection, etc., which can effectively prevent damage to the device caused by circuit failure or abnormal operation. These protections not only enhance the reliability of cell phones and tablets, but also reduce the safety risks caused by battery problems.
Drones
The TP4056 ensures that drone batteries can be charged safely and efficiently with its excellent charge management features. It adopts a two-stage charging mode of constant-current and constant-voltage, which can automatically adjust the charging parameters according to the state of the battery, effectively avoiding safety issues such as overcharging and over-discharging. In addition, by working with the motor controller, the TP4056 can adjust the working parameters of the motor in real time according to the flight status of the UAV, ensuring that the UAV can remain stable during flight. This intelligent motor drive control not only improves the flight performance of the UAV, but also reduces the safety risk caused by motor failure.
Precautions for Using TP4056
When using TP4056, we should pay attention to the following aspects:
TP4056 prohibits reverse battery connection, otherwise it may lead to chip burnout. To ensure safety, we have specially designed the anti-Lithium battery reverse connection protection circuit to prevent the battery reverse connection problem caused by misuse.
In the application of TP4056, it is recommended to place the 10μF capacitor connected at the BAT end close to the BAT end of the chip to ensure that the connection between the capacitor and the chip is as short as possible. This is conducive to optimizing the circuit layout and reducing line losses, thereby improving circuit stability and efficiency.
When TP4056 is applied to high-current charging (700mA and above), in order to effectively shorten the charging time, it is recommended to increase the heat dissipation resistor, whose resistance value should be controlled within the range of 0.2Ω to 0.5Ω. We should select the appropriate resistor size according to the actual use situation to ensure the safety and efficiency of the charging process.
When carrying out the test of TP4056, the BAT end should be directly connected to the battery, instead of connecting an ammeter in series. If you need to measure the current, you can connect the ammeter to the VCC terminal to ensure the accuracy and safety of the test.
To ensure that the TP4056 can be used reliably under all circumstances and to avoid damage to the chip caused by spikes and burr voltages, we recommend that a 0.1μF ceramic capacitor be connected to the BAT terminal and the power input terminal respectively. At the same time, when wiring, we should ensure that these capacitors are as close as possible to the TP4056 chip to optimize circuit performance and improve overall stability.
The TP4056 is packaged in a SOP8-PP. To ensure its proper operation and efficient heat dissipation, we need to solder the bottom heat sink tightly to the PCB board in use. It is recommended to add through holes in the bottom heat sink area and supplement it with large copper foil to enhance the heat dissipation effect. Multi-layer PCB combined with adequate through-hole design can significantly enhance the heat dissipation performance and avoid the charging current being reduced by temperature protection due to poor heat dissipation. In addition, adding appropriate perforations on the backside of the SOP8 for heat dissipation not only helps to improve the heat dissipation efficiency, but also facilitates manual soldering operations. During the soldering process, we can pour solder through the backside perforations to ensure reliable soldering on the heat dissipation side and improve the stability and reliability of the overall connection.
Frequently Asked Questions [FAQ]
1. What is TP4056 used for?
This module is made for charging rechargeable lithium batteries using the constant-current/constant-voltage (CC/CV) charging method. In addition to safely charging a lithium battery the module also provides necessary protection required by lithium batteries.
2. How many batteries can a TP4056 charge?
You can connect two lithium battery cells in parallel to form an equivalent single cell battery with a total capacity of twice that of the individual single cells.
3. Can a TP4056 charge a 3.7 V battery?
TP4056 Charger Module can be used for multimeter to convert to charge lithium batteries. VIN+ port input 5V solar panel, BAT+ port can output 4.2V to charger 3.7V 18650 battery.
4. What can I charge with TP4056?
A TP4056 can charge at 1A maximum. You can charge just about any li-ion/lipo battery with it provided you set the current accordingly. Many modern batteries permit charging at currents greater than 1C. There is some debate about charging multiple batteries in parallel.
5. Is TP4056 safe?
It may not be safe, depending on your batteries max charge current. Best way to find is mobile phones charger, If your phones charger output is equal or above 900mA you can use a typical TP4056 module as it comes with default charge current set to 1000A using 1Kohms register.
About us
ALLELCO LIMITED
Read more
Quick inquiry
Please send an inquiry, we will respond immediately.
Exploring the Timeless Technology of Crystal Set Circuits
on September 3th
Understanding SS34 Diodes: Uses, Advantages, and Key Specifications
on September 3th
Popular Posts
-
What is GND in the circuit?
on January 1th 3092
-

RJ-45 Connector Guide: RJ-45 Connector Color Codes, Wiring Schemes, R-J45 Applications, RJ-45 Datasheets
on January 1th 2661
-
Understanding Power Supply Voltages in Electronics VCC, VDD, VEE, VSS, and GND
on November 14th 2185
-

Fiber Connector Types: SC Vs LC And LC Vs MTP
on January 1th 2175
-

Comparison Between DB9 and RS232
on January 1th 1799
-

What Is An LR44 Battery?
Electricity, that ubiquitous force, quietly permeates every aspect of our daily lives, from trivial gadgets to life-threatening medical equipment, it plays a silent role. However, truly grasping this energy, especially how to store and efficiently output it, is no easy task. It is against this background that this article will focus on a type of coin cell battery that may seem insignificant on the...on January 1th 1773
-
Understanding the Fundamentals:Inductance Resistance, andCapacitance
In the intricate dance of electrical engineering, a trio of fundamental elements takes center stage: inductance, resistance, and capacitance. Each bears unique traits that dictate the dynamic rhythms of electronic circuits. Here, we embark on a journey to decipher the complexities of these components, to uncover their distinct roles and practical uses within the vast electrical orchestra. Inductan...on January 1th 1726
-
CR2430 Battery Comprehensive Guide: Specifications, Applications and Comparison to CR2032 Batteries
What is CR2430 battery ?Benefits of CR2430 BatteriesNormCR2430 Battery ApplicationsCR2430 EquivalentCR2430 VS CR2032Battery CR2430 SizeWhat to look for when buying the CR2430 and equivalentsData Sheet PDFFrequently Asked Questions Batteries are the heart of small electronic devices. Among the many types available, coin cells play a crucial role, commonly found in calculators, remote controls, and ...on January 1th 1667
-
What Is RF and Why Do We Use It?
Radio Frequency (RF) technology is a key part of modern wireless communication, enabling data transmission over long distances without physical connections. This article delves into the basics of RF, explaining how electromagnetic radiation (EMR) makes RF communication possible. We will explore the principles of EMR, the creation and control of RF signals, and their wide-ranging uses. The article ...on January 1th 1665
-
Comprehensive guide to hFE in transistors
Transistors are crucial components in modern electronic devices, enabling signal amplification and control. This article delves into the knowledge surrounding hFE, including how to select a transistor's hFE value, how to find hFE, and the gain of different types of transistors. Through our exploration of hFE, we gain a deeper understanding of how transistors work and their role in electronic circu...on November 14th 1616


